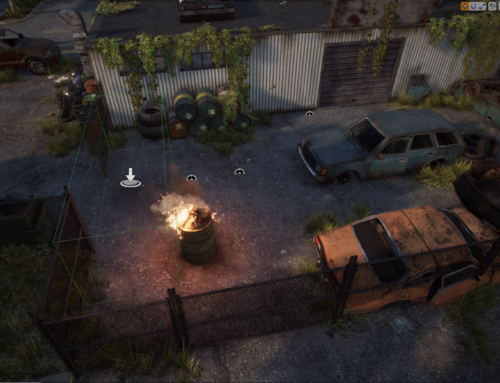
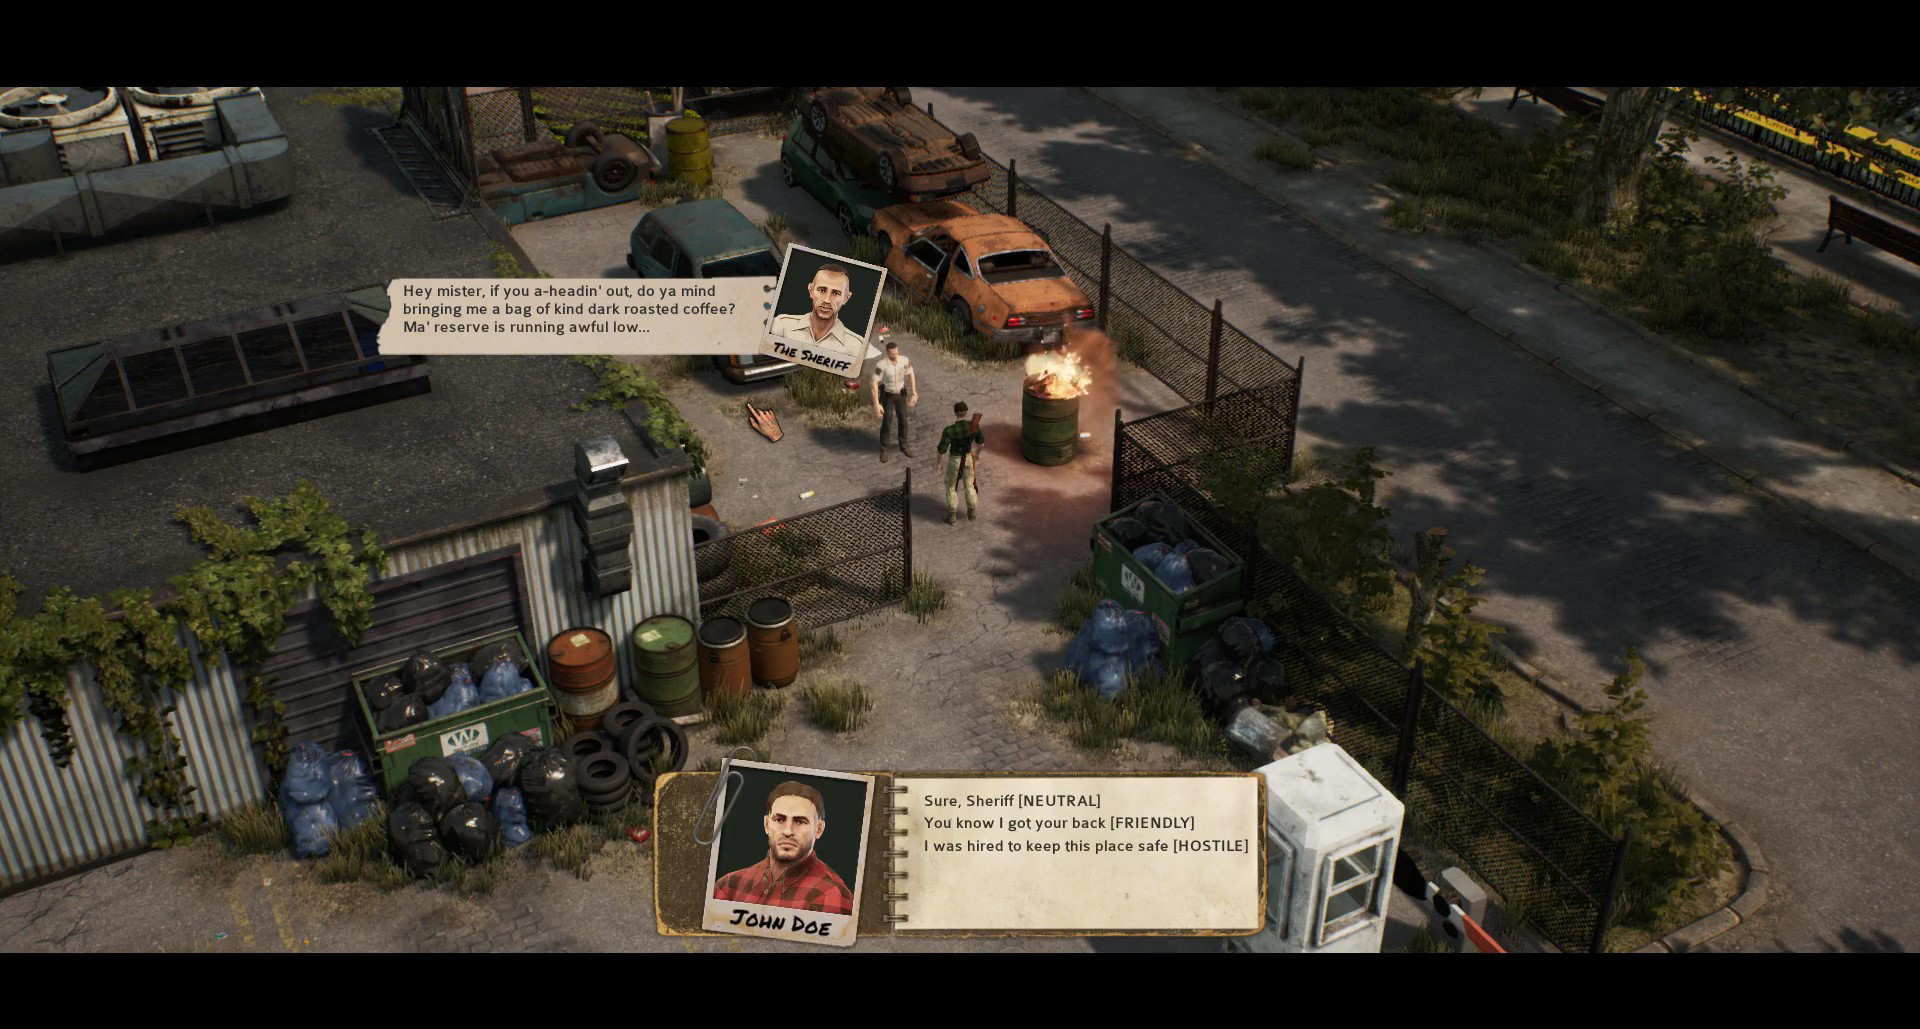
In this small modding example, we have Billy Bo Hicks, the acting sheriff in Urban (let’s pretend though it’s a new character we’re making from scratch), wasting time somewhere in the Shelter. Once he spots our hero (this means you) entering his defined proximity area, he stops from what he’s doing and calls you over. It appears that the Sheriff Billy needs something from you. The next video shows the final result. We will break down everything needed to get here in a few easy steps, showing our internal editor (that will be released as part of the Modding SDK):
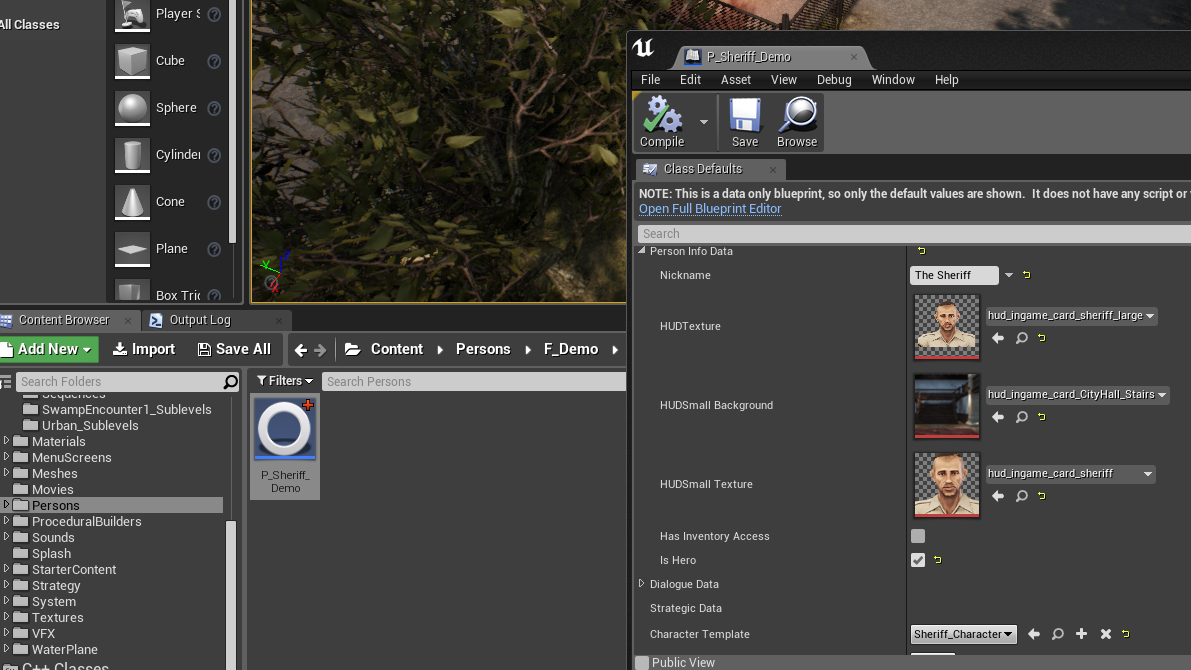
The first step is to add a new person blueprint (aka The Sheriff in our example) to the Content/Persons folder and to initialize it with some default values such as: Nickname (his actual name in game), HudTexture (his face in dialogues and other HUD elements, easy to make and replace) & Character Template (3d visual representation – this one goes into advanced modding to be covered later).
The Is Hero checkbox indicates that we can interact with The Sheriff or we can have him controlled by FSMs, as opposed to him being just a random NPC spawned to live and die in anonymity.
There are also other initializations that can and should be done (such as attributes & perks), but we will leave those for another time.
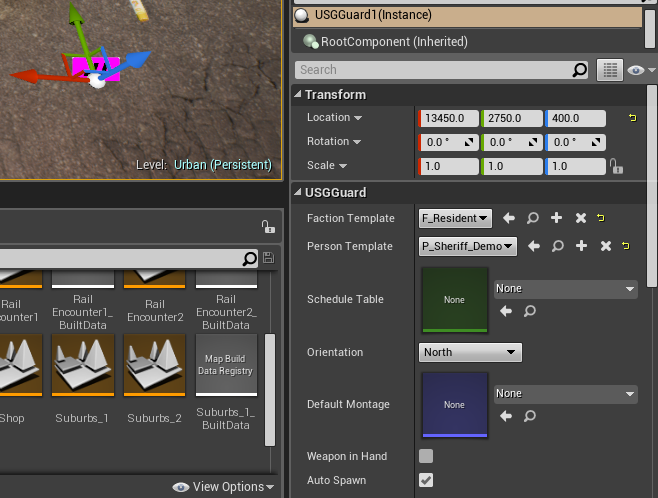
The second step is to add The Sheriff to the map where we want him to perform. A Hero is bound to the map where it spawned for the 1st time. A Hero will not spawn into another map without being transferred there via Scripts (FSMs) or recruited by player.
We do this by dragging an USGGuard instance into the scene (the specific map level, for example the Urban Shelter) and setting this blueprint to load the persona P_Sheriff_Demo we’ve set-up in the first step. This is where he’ll spawn in the world. We also must give him a faction (in this case, he’s one of the entitled residents of Urban Shelter). Now we have The Sheriff sitting there and doing nothing. How nice of him!
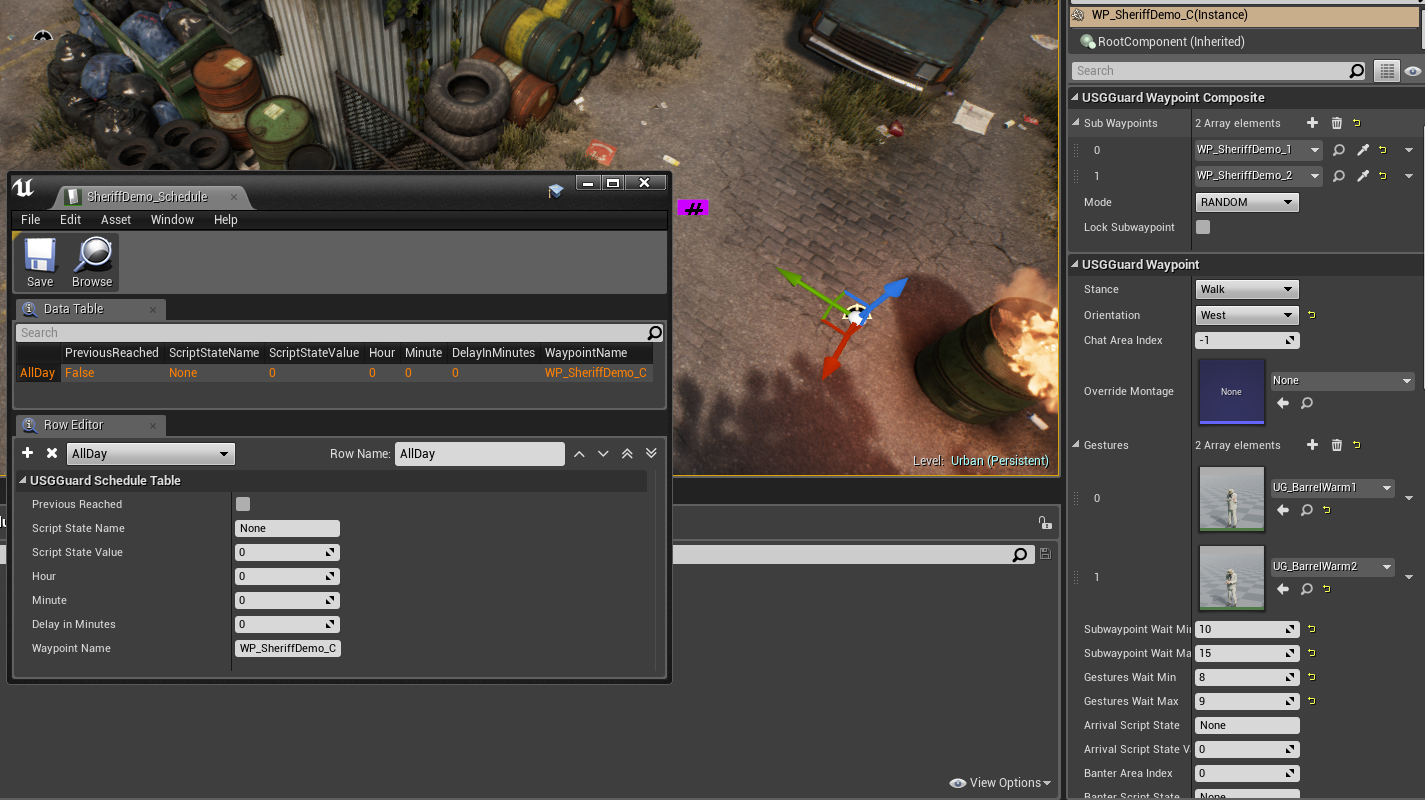
The third step is to make The Sheriff alive! For this we need at least one Waypoint and a Schedule entry assigned to The Sheriff’s USGGuard instance.
For this example we decided to use a CompositeWaypoint. A composite combines a bunch of simple waypoints and executes them either in sequence or random, in order to simulate complex activities. For example, a cook can open the fridge, wash the dishes at the sink and use the stove while still running the same schedule entry (cooking). Each sub-waypoint can execute all sorts of actions, from simply playing a banter (non-critical speak), performing gestures (animations), or entering in a group chat with nearby NPCs. And of course, for higher level actions there are always FSM set conditions for controlling the behavior.
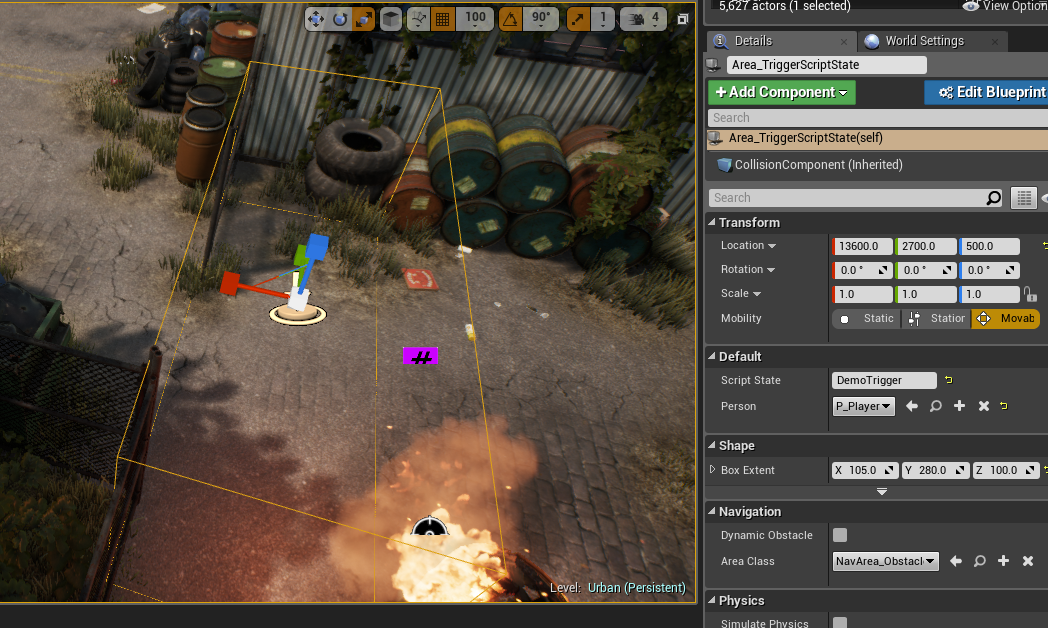
The fourth step is adding a ScriptState TriggerArea type. Remember, the Sheriff was minding his own business until we approached him. What happened was that we entered the TriggerArea and we set a specific ScriptState when the Hero stepped into it. It can be as simple (ON or OFF) or as verbose as you want it (PLAYER_GETS_NEAR_SHERIFF). In our example we decided to go for a very casual DemoTrigger name.
Now that you’ve triggered DemoTrigger, any other script component that has been set to listen to changes to this specific ScriptState will react to it.
The fifth step is to add two more waypoints for our cutscene. One is reserved for Player, the other one is reserved for The Sheriff. We covered dragging waypoints into the scene earlier, when we setup the composite. This is similar, only these waypoints are basic. Since our two actors won’t be performing complex actions while talking to each other, simple waypoints will do just fine. Let’s move on.
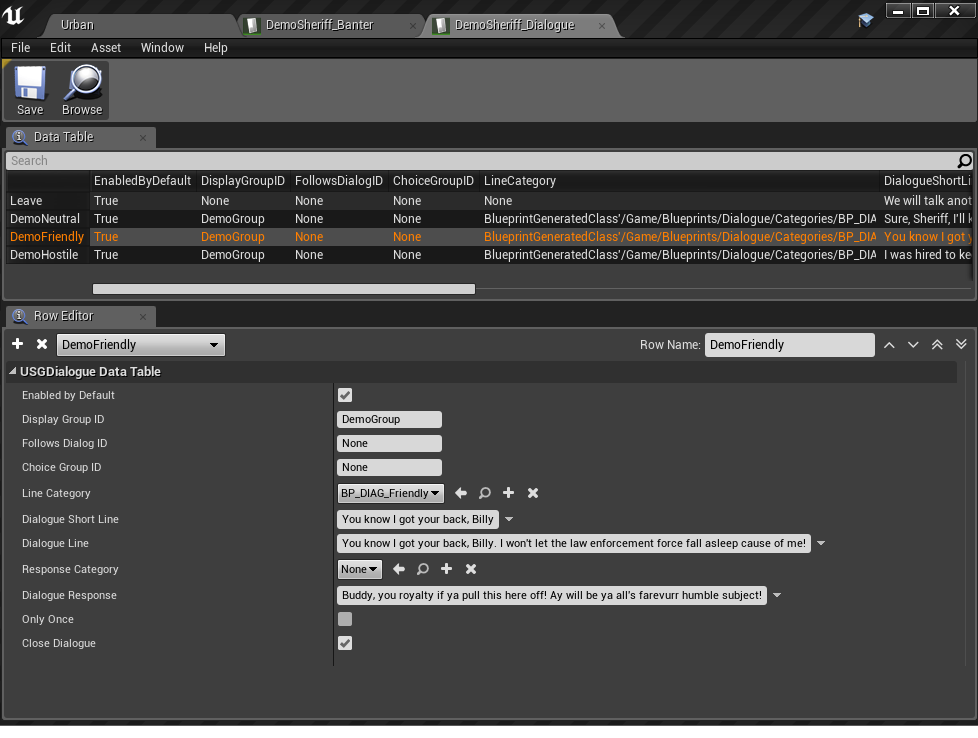
The sixth step is to add The Sheriff banter and dialogue text for this specific exchange. Banters are lines the NPC will say to initiate the dialogue (do not confuse with random banters, which are non-critical lines of chatter you’ll see floating above various minor NPCs). Dialogues include both the Player lines (short and long versions) and the NPC replies.
You might remember that in our short dialogue we had three choices. These are done by grouping dialogues in a single DisplayGroup. A DisplayGroup is also useful when entering a narrative flow to avoid seeing every choice from every other active quest. In this case, the FSM will hide the default Leave dialogue option by switching to DemoGroup. When you’re done, these specific choices go away and we’ll back to the default lines of dialogue and/or other active missions.
And finally… the Finite State Machine or FSM! Each quest has its own FSM. It’s the logical script that drives everything under the hood. Yet it requires just your analytical thinking not extensive coding knowledge! If you can come up with a good algorithm, you can create great FSMs yourself. By default USG has a very generous library of Conditions and Actions you can assemble into a FSM. We coded them for the needs of the game and for most people they should suffice. But if they’re not enough for you, there is no problem, you can add as many of them as you like via UE4 Blueprints or Code.
From a FSM you can start, stop and check other FSMs, thus you can start subquests and script very complex and nonlinear outcomes for your quests.
If you don’t know the basics of a FSM, there is this Wikipedia link for you:
https://en.wikipedia.org/wiki/Finite-state_machine

We hope you liked this brief excursion in the world of USG modding. The above is not a tutorial, just a short preview. Hopefully by the time modding will gain enough traction we’ll have an entire wiki of modding knowledge at your disposal.